Shield!
By Anders B AOR
After I’da finished the hammer that were featured on this site a while ago, the itch to make something that were associated with both our ancestral past and our faith got the better of I, and so too, the need to return to me shed in Svartalfheim with me fellow spiritual dwarf smiths. After looking at the swords and t’other ornamental items I’da got scattered around me home, I decided that a shield would go well on the wall to complement the swords, so as ye do, I set to and made a start on me next project.
I wanted to give the front of the shield an original look with the wooden boards placed together, so I’da use some 5mm thick internal wall decorating boards that slat together, and to hold’em together, I’da use a sheet of 5mm thick M.D.F for the back to stick the front boards to. After sticking’em together, I’da mark-out the outer diameter of the shield, and cut-out the shield using a jigsaw. After this, I marked out where the centre boss and handle were going to, and cut-out the centre, leaving a 1 inch flange to stick both the lip of the boss and handle to. I then gave all rough edges a good ole sanding down – along with the remainder of the shield, ready for marking out the front design and painting, as well as filing down to a tapered edge, the inner back edge where the handle / centre boss be to.
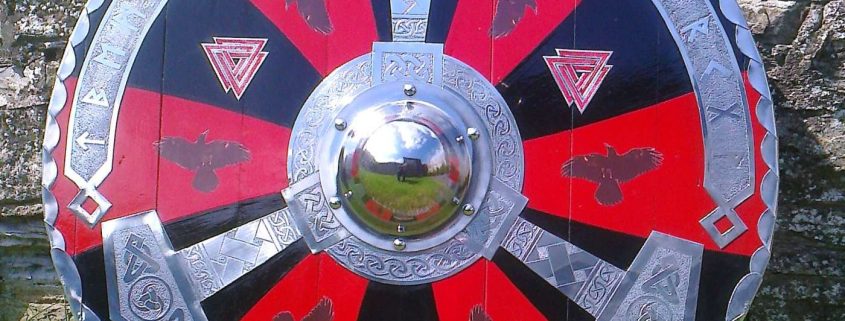
Next up, were the design on the front of the shield. After looking at the Black Sun design, I’da came up with a compromise of the usual segments you’da see on some shield designs, and adding a slight twist to the segments to give a sun swirl effect. ( See picture ).
After the front design were marked up, I never wanted to cause any damage to the paint by all the trial fitting of the boss and tother metal additions, so I’da left the painting until all the metal work were finished.
I’da want the shield to weigh as light as possible, so I’da use 1mm thick aluminium sheet, to make the surrounding edging, the oath ring and hammers, plus the plaques for the futhark. The only thing I never made, were the centre boss, which I’da get from a Medieval fare at Glastonbury.
The first job were to mark-out the three hammers, representing Odin, Vili & Ve, as well as Faith, Folk & Family, plus the oath ring to unite’em together as a hallowing gesture and swearing our loyalty to our faith.
This I’da do, by printing-off onto stickers to use as templates, some knot work designs – along with the triple horns, ensuring they be the correct size before cutting’em out – along with the hammers, which be copies of the hammer I’da made previously.
After this were done, I’da stick’em to the aluminium sheet, and cut-out the hammers & oath ring, plus the plaques for the Elder Futhark, followed by filing off any bur’s from the edges. I then trial fitted the design to the shield, to mark-up the area to be cut out from the centre. This I’da do, and again filed smooth the edges.
To make the handle, I’da use a piece of aluminium pipe, cut to size and the ends flattened with a gurt ole hammer, before drilling the required holes for the securing skrews. I also chiselled out, just enough wood to counter sink the flanges of the handle to be flush with the surface of the front of the shield.
Next job were the most time consuming and needed the most concentration, as there be no room for errors, and that be the engraving. The first part I’da engrave, were the oath ring, so I could ensure the gap around the edge of the centre boss were correct, before continuing with the remainder of the knot work design. Umpteen hours later, the oath ring were finished. Next, the hammers, and again many, many hours of time consuming engraving. After I’da finally finished’em, I prepared’em for polishing.
After this, I’da set too and started on the plaques. Again, I marked out and cut and filed out, the inside of the Odal runes at each end of the plaques, before spending countless hours engraving the Futhark onto’em.
I’da tell’e now folks, tis a good way of escaping the hustle and bustle of daily life – as well givin yerself back and neck ache from sittin very still for long hours at a time!
They too were prepared for polishing, before starting on the surrounding edge design. This I’da make, by measuring the length of the outer diameter of the shield, and cutting three strips of aluminium to the right length and width. For the design, I decided that I’da want it to look like a rope. Firstly, I’da mark out and draw the rope on each piece of the aluminium. After this, I’da set to, and cut out the rope, making sure not to cut any further than the thickness of the shield, plus ensuring I’da left some good size securing tabs on each end to hold’em in place with tacks. When finished, I offered up and bent’em round the shield and temporarily secured’em into place with tacks. Next, I had to fold each segment of the rope design around and down flat with both the front and back of the shield, in a platting manner so that each segment overlapped tother, allowing the curve around the shield. To finish, I’da use a rubber mallet to tap and flatten down any unlevel areas, to ensure a good flat edge on both sides.
To make the knot work covers above the hammers, I again repeated the process when making tother designs for the shield – platting it round the edges to get it to curve with the dimensions of the shield, before preparing’em for polishing. When all were done, I’da took’em all off and put’em away till the time came to polish’em.
The next job were to paint the segments and the back of the shield. I chose to use the colours of the blood red raven and sun on the black banner. Firstly, I’da paint the back of the shield with three coats of gloss black paint. To paint the front, I had to lay the shield on a soft cloth, so no damage would occur to the paint on the back. I’da paint the black segments first, and then the blood red segments second with gloss paint, repeating the process three times to ensure a smooth, high shine finish.
T’were time to polish the boss and tother aluminium parts for the shield, and this I did by using a polishing wheel attached to a power tool, and polishing compound to achieve the mirrored finish. It took I a few hours to finish’em, ready for final fitting.
The first thing I’da fit were the handle, followed by the oath ring and hammers, and finally the centre boss. After ensuring everything were correctly in place, I’da press’em down on to the shield, before drilling the pilot holes into the shield where the holes were to on the centre boss flange, making sure not to drill through to tother side. When done, I’da screw’em all down into place, using some screw’s with screw-in dome covers that look like the rivets normally used.
To secure down the hammers, I’da use a strong bonding compound and weights to keep’em pressed down until the adhesive were dry.
To secure the outer rope edge and covers, I’da press’em into place and secure’em down with tacks.
After this, I stuck down into place, the plaques, using the same adhesive as before. It were at this point, that I’da decide to add the Valknut’s and ravens. The ravens I’da got from images of ravens via the internet, which I had printed onto a vinyl sheet. I had to carefully cut’em out, before sticking each one into place. The Valknut’s I’da make from some spare bits of aluminium, by using the same process to make tother items fitted to the shield, except I’da paint’em red, and to give’em a two tone effect against the black, as be the same with the black ravens on the red. As with tother items, I’da stick’em to the shield with the same bonding compound and press’em down with weights until dry.
Alas! After around one and a half years in total, and many, many hours spent with me fellow dwarf smiths in me shed in Svartalfheim, I’da finally finished it! A funny irony be that I’da be a member of the Draupnir hearth A.O.R, and that the ring Draupnir were made by they dwarf smiths themselves! Ooh Arr!


Leave a Reply
Want to join the discussion?Feel free to contribute!