Yule (Scandinavia): How to make a Julbock
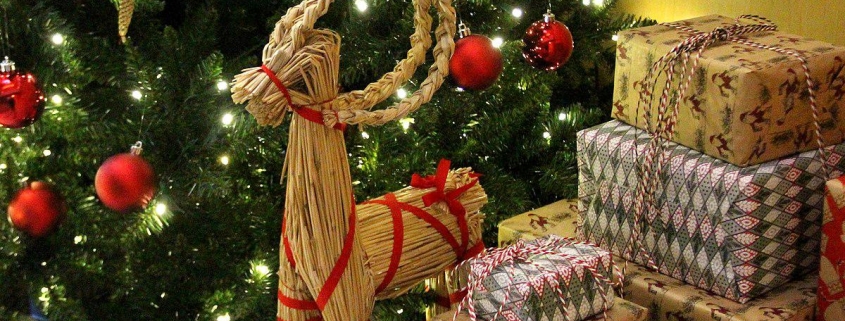
The Julbock is a universal Scandinavian symbol of Jul. It is believed that the Julbock is accompanied either by a God, such as Thor or in contemporary times, Santa Claus. A “Tomten”, “Nissen”, or Jul Elves also frequently accompanies him. These little shepherds tend to the Julbock and lead him to the houses of Folk children. Although the custom changes a bit from country-to-country, the Julbock is a constant theme. Below are instructions to create your very own Julbock for under your tree. Be on the look out for instructions for your very own Tomten to accompany him!
Some notes on this craft:
This craft takes a couple hours your first time, but should move faster the next time you do it.
It would be a good craft for kids 10 and up, but a 3 year old still loved helping, so keep the lil ones in mind.
You can scale this easily for whatever lengths of stalks you have, but the first time making it make sure you do it to this size for practice.
Please see notes for specific instructions below for tips and hints.
Materials:
- A two inch diameter bundle of wheat stalks including the heads (20-24” long)
- 3 strands of 16 gauge craft wire (18” long)
- 5 strands of 28 gauge craft wire (18” long)
- Thread or dental floss for tying. Embroidery floss works great!
- 1 yard of red ribbon, 3/8” wide. (NOTE: Although the rules say that cotton or wool is “required” it is extremely difficult to find in a “Michaels” type store. I went with some wool like “blend” ribbon. See picture.)
- Scissors for trimming (kitchen scissors).
- Pliers for bending wire ends under.
- Bath towel
Prepare the Wheat
- Cut the heads off the wheat stalks leaving a 1” stem on the heads.
- Soak the stalks in hot water for 4 hours or more. This will ensure pliability.
- Drain stalks and work on a flat surface covered with a bath towel
- You can soak the stalks in the bath tub or a clean kitty litter box. Weight down the stalks to keep them completely submerged.
Creating the Julbock
- Divide stalks into three even bundles. Cut two bundles even at 18” long. Then turn half the stalks in each bundle in the opposite direction. (Note: This makes a nice even cut on both ends of the bundles.)
- Bend back the ends on two 18” lengths of 16g wire (bend back about ½”) .
- Insert wire in each of the two 18” bundles and tie securely one inch from the end and again 4 ½ inches from the end. Tie with strong thread, dental floss, or 28g craft wire around twice, pulled snug, then twisted twice and ends wrapped back around bundle. (Note: It is suggested you get a second person to help with the “tying” portions because you need to tie them VERY tight. Embroidery floss works great!)
- Bend each of the two tied bundles just above the last tie (at 5” from the end) to about a right angle. These are the Julbock’s hind legs.
- Now remove three long and pliable stalks from the unused bundle to make the Julbock’s tail. Tie the stalks together at the narrow end (use thread or floss) and braid for about three inches. Fold over each stalk as you braid it. Tie again at the end of the braid.
- Place end of the braid on top of bend over the hind legs, and tie all bundles together to make the rump.
- Tie again five inches from the rump bend.
- Bend bundles upward after the last tie.
- Measure 3 ½” and tie again, making the Julbock’s neck.
- Bend the end of the bundle forward at 4 inches from the bottom of the neck, to make the head.
- Before finishing the head, braid three stalk-ends from each side for horns (start at the last tie). (NOTE: This instruction means that you just take 3 stalks from each side of the head ABOVE the last “neck” tie and braid.) Tie with thread. Gather remaining bundle around wire ends and tie, and about 1inch from the end.
- To make the front legs, gather the last bundle of wheat and cut even at 11 inches. Turn half of the stalks in opposite direction. Tie in the center, and bend into “U” shape on either side of the tie.
- Cut an 11 inch piece of 16g wire and bend in the same direction at 5 and 6 inches (middle). Push one end of the wire through the bottom of the Julbock’s neck, side-to-side, angled down. Bend back wire ends ½ inch. Lay wheat bundle around top side of neck and bring ends down to surround the wires on each side. NOTE: You need to use some of the left over 16g wire to tie down the legs in a crisscross fashion (see picture). This will ensure that the it will dry “flush” with the back and neck. It will still be like a hump on the curve of its neck, but not as pronounced.
- Tie just below body and again about one inch up from ends.
Finishing Touches
- While the wheat is still damp, trim the Julbock’s nose, feet, and braids.
- Carefully remove any wheat sheaves that may stick out and hold any broken stalks down with a bit of cellophane tape.
- Gently wrap 28g wire around tail and horn braids, and form into curls to dry. Add wheat heads to the chin.
When the Julbock is dry (24-48 hours), gently remove wires from braids and decorate with red ribbon. You may need some glue (glue gun works the best) in spots to help hold the ribbon in place.
Some “rules”:
The legs should be longer than the abdomen, the neck should be as along as the abdomen. Also the ribbon shouldn’t be synthetic but rather cotton or wool. Finally, no bows or the like, the goat is a male!
The above instructions were from a copy from a book, I have no idea the name of the book, but if anyone knows, I would be more than please to cite it. Rest assured though, we have made this Julbock and it works well! Check out our pictures on the Acorn Hollow website
Hyndla OR
A good link for this activity can be found at http://laughingcrowe.com/handcraft/to-make-a-yule-bock/
Julbock Coloring Sheet


Thanks for publishing these instructions. I have been all over looking for them. It should be a fun project. Now if I can only find the wheat stalks to make them.
You are very welcome Diane. Let us know how you go and feel free to send us some pics.
Delighted to find this! Thanks a bunch.
Hi,
Thanks for posting these instructions. Any chance you have any instructions with pictures? Kind of hard for me to follow the text.
Hi Matt,
I have emailed you some pictures. I will get some up on the site asap 🙂
Thanks so much for the comments folks!
FFF
Lovely, concise directions. The only improvement would be accompanying photos of each stage (take some on your next project?).
These are wonderful additions to Yule decor, tie millenia of legends of the season together, and are especially awesome for those of us of Norse/Germanic heritage.
Also cool for Marvel comics fans: after all, it’s Thor who drove a goat chariot!
I had some corn (maize) from my garden, and used that instead of wheat to create an American julbock… it worked quite well, though I suspect I should have soaked the shocks.
Thanks for posting the instructions for the yulegoat! I am an art teacher and would love the coloring sheet for my students. I can’t seem to open the pdf. Could you send it to me?