
Hail the Heathen Hammer
By Anders B. AOR
Note: This article was to have been accompanied by step-by-step photos, however these were lost when Andy was burgled and had his computer stolen.
It were at last year’s G.M, that Blutgeist OR gave a talk and meditation on the hammer and what it means to us that bit deep into me, to the point that I had this overwhelming feeling to make a hammer to be of a high enough standard to represent our faith. It wasn’t long before I was gathering the tools and materials needed to make one in November. I looked into using the wood from a fallen cider apple tree, but amazingly as I’m surrounded by thousands of them, I couldn’t find one with a large enough trunk to use for my project. I decided to settle on the next best thing and use English oak.
I found a local sawmill near the town of Shepton Mallet, who had some local green English oak, and bought a piece with no splits and enough for my requirements. I started by making a template to cut the wood to the right size and shape. I then cut the wood for the head as near to the specification of 10 inches wide, 4 inches thick and 4.5 inches high before working it further. I then cut away the corners of the handle to round it off, before making up a lathe jig out of scrap wood to use to turn it and get it nice and as flat as possible. I attached one end to a nail, and the other to my electric drill, which turned it at full speed.
Once done, I worked the end block to the size of 4.5 inches wide, 2.5 inches high, 2.5 inches thick and the total handle length being 9 inches. I followed this, by cutting out a 1 inch square and 3 inch long shaft at the other end to make ready to be inserted into the head of the hammer.
After this, I cut and chiselled out a 1 inch square hole in the hammer head to receive the handle, and sunk the base of the head by removing 5mm of wood from the base of the head, leaving a 10mm edge. I had to ensure it was a tight fit mind, as no glue was being used. Once done, I drove the handle into the head using a rubber mallet so as not to split the wood. It was good to see it together for the first time!


Next job was to mark up and carve down 5mm deep, leaving 10mm edge’s all round, the surrounding areas where the finished brass sheet designs would be attached. This process took a long time and there was no room for error’s to cause split’s, with the same process being done for the block on the handle, but this time, I left 6mm edge’s all round. Once finished, I set to and started to make the ring. I did this by cutting a slice of the remaining oak to 1 inch thick and 7.5 inches square. I then marked out the diameter of the inside circle to leave the ring 1 inch thick, before drilling out and cutting away the inside wood, followed by cutting away the outside sections to leave me with the ring. As with the handle, I needed to make up a mounting bracket / jig to attach to my electric drill, to turn it to get it nice and as near perfect finish as possible. I did this by using two pieces of scrap hardboard cut to size, and inserting a nut and bolt in the centre to mount it to the drill. Once done, I tacked it to the ring before mounting it into my drill to turn it at full speed. Again, I had to be very careful not to break the ring or touch the mounting jig whizzing round at full speed to avoid a disaster.
Once finished, I detached the ring from the mounting jig, and worked the remainder by hand using wood rasps and sandpaper, being careful not to use too much pressure to avoid breaking the wood. After a thoroughly good sanding all over, I then treated all the wood, by working into the wood a good ol’ dollop of pure beeswax polish to stop any cracking and to bring up the finish of the wood.
When finished, I marked out the gap where it would be attached to the handle block, before marking out and drilling out the holes for the brass rod to pass through. I also drilled the holes in the handle block at the same time. I then cut and trial fitted the section of brass rod to be used to make sure all fit ok, before moving on to all the brass work.
The first brass work task was to make the securing plates that secure the head to the handle. I did this, by cutting and filing two pieces of 0.9mm brass to size and making the knotwork design, leaving a flange which I folded to fit against the top of the handle. After chiselling away 1mm of wood for the brass flanges, I attached the securing plates to both the handle and head using 1 inch long brass tacks. Once I was satisfied the handle and the head was well solid, I then measured up, cut and filed to size a section of 0.9mm brass sheet to make up the box surround that wraps the head. This was done by folding round the edges a 10mm lip and cutting away the required amount to be able to fold the box around the head to form a single piece box section and also acting as a securing frame around the head to stop any splitting. When all fitted to as near perfect as possible, I then cut away the mid-sections, again to leave a 10mm lip all round, and used the cut away brass to make the knotwork designs on the top, ends, and sides of the head. This process was again done to make the box surrounding the handle block, but this time folded to leave a 6mm lip all round. To make the blanking plates I cut and filed to size the 0.9mm brass and cut away the holes for the handle to pass through, before cutting in half the top plate. This had to be fitted around the top of the handle block before fitting the box surround, and the other piece around the end stub. I then engraved a knotwork design onto them, before securing them to the handle, and fitting and securing with brass tacks, the outer box to as near perfect fit as possible.


The next task was to make the bands that surround the handle. I did this by making a template of the exact size and shape needed from paper, and used them to mark out the brass before cutting and filing them to size. I then made some knotwork templates and stuck them to the brass before cutting away the areas to be engraved with a craft knife. Once ready, I set to and engraved them- it took many hours to do. Next was to measure up, cut out and fit the leather surrounding the handle to the knot work design. I did this by making a template, and cutting out and trial fitting the strips till I had the right size and shapes to mark out and cut the pure leather hide (which I got from a leather specialist in Cheddar) to the right sizes. Once happy, I wove them round the handle and secured them with large brass tacks. I trimmed off the excess ends to ensure a nice neat fit all round.
Once finished, I set to and carefully bent the brass bands around the handle until they were a good tight fit, before carefully trimming and filing off any excess metal to ensure as near a perfect, flush fit as possible, before securing them to the handle and covering the ends of the leather in the process.
The next task was to make the end disc that covers the end of the handle. I did this by measuring up and cutting and filing to a near perfect fit as possible, a piece of 0.9mm brass sheet, and drew on a shield cross that you would see on a Viking shield, before engraving it into the brass. Once finished, I secured it into place with brass tacks, and carefully filed round the edge to ensure as neat a finish as possible.
I then turned my attention to the head, and began making the knotwork designs that decorate it. The first thing I made was the knotwork patterns on the top on the head. As before, I made templates, and stuck them to the brass sheet before cutting out with a craft knife, the areas to be cut away and worked to size. Once done, I embossed the lap-over parts of the knot bands, by using the engraver. I also did this with the Odal rune knotwork designs on the side of the head, but this time I did the embossing by stamping it with a hammer and punch. I made them while at the O.R’s folk camp, which some of you may remember.
I secured them to the head with brass tacks. For the centre discs, I cut and worked to size, two copper discs from an old copper cooking pot which I got from a car boot sale in Cheddar. As before, I drew the runes on a template, before sticking them to the copper disc’s, and punching out each rune using the end of an old electrical screwdriver, being very careful as there was no room for any mistakes. When finished, as before, I secured them on with brass tacks. The Valknuts are made from the brass sheet, I embossed them with a hammer and punch and secured with brass tacks.
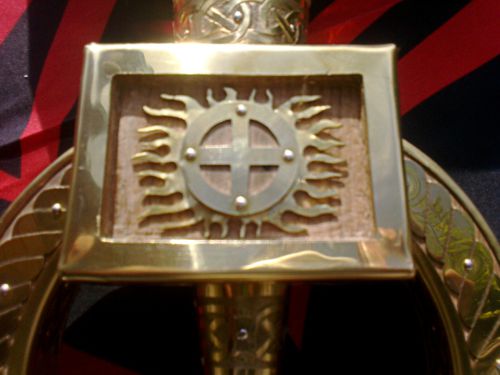
The end of the head designs were made by cutting and working to fit two brass plates and completely engraving them. I then cut out and made the knot work pattern the same way as the others before carefully placing them into location and securing them with brass tacks. The fiery sunwheels on the handle block I made by marking out and cutting and filing away the unwanted brass metal until I had the two sunwheels. The flames I made by again marking out and cutting away any unwanted metal, and then very carefully filing around each lick of flame with a small warding file to achieve the desired effect. I attached them to the handle block, by pressing them round the wood mounts for the sunwheels, ensuring they were a tight fit, and tapping them down into place. The sunwheels are secured into place with brass tacks.
The next task was the ring, where I again made up and measured two templates of a rope circle, sticking them to the brass. After I cut the brass rings out, I filed down the outer edges to shape them into dimensions of a rope and engraved the lines across to finish off. I trial fitted them and filed off any excess metal to ensure a near to perfect fit before securing them on with brass tacks. I made sure I fitted the rings first, to stabilize and strengthen the fragile 1 inch thick wood, before cutting away the area where the handle block goes. This I did and tidied up the ends to ensure a neat, flush fit. Next up, I made the inner ring’s brass strip, by measuring and cutting to size, and tapping and folding the edges with a hammer in my bench vice. After tidying up the edges, I set to and made up some more knotwork pattern designs, and stuck them to the brass and cut away the areas to be engraved. After many hours, I finished the engraving, and carefully bent it round to fit inside the ring until a near to perfect fit. After using a file to tidy it up, I again secured it into place with brass tacks.


To make the outside edge of the ring, I repeated the process used to make the inner edge brass plate, except this time I had added the rune Thurisaz on the sides. When finished, I bent it the other way to as near perfect fit as possible, before trimming and filing the edges to a nice flush fit. It was at this point that I had to attach the ring to the handle block by pressing the brass rod through and ensuring it fit perfectly and the ring swung freely. Once happy all was ok, I then set to and secured the outer brass plate to the outside of the ring with brass tacks.
To finish off, I bought some copper/brass polish and gave it a good ol’ polish to bring it up to a high shine finish. The feeling of finally finishing it after ten months and many hundreds of hours was a truly good’un, and so another project was finished.
It’s a good size overall, with the measurements being; 10 inches wide, 4 inches thick and a total length including the ring of 18inches long. Most of all, it’s English, made by an English Odinist of the Odinic Rite!


